


Bun 快速的原生打包器可以通过 bun build CLI 命令或 Bun.build() JavaScript API 来使用。
await Bun.build({
  entrypoints: ['./index.tsx'],
  outdir: './build',
});
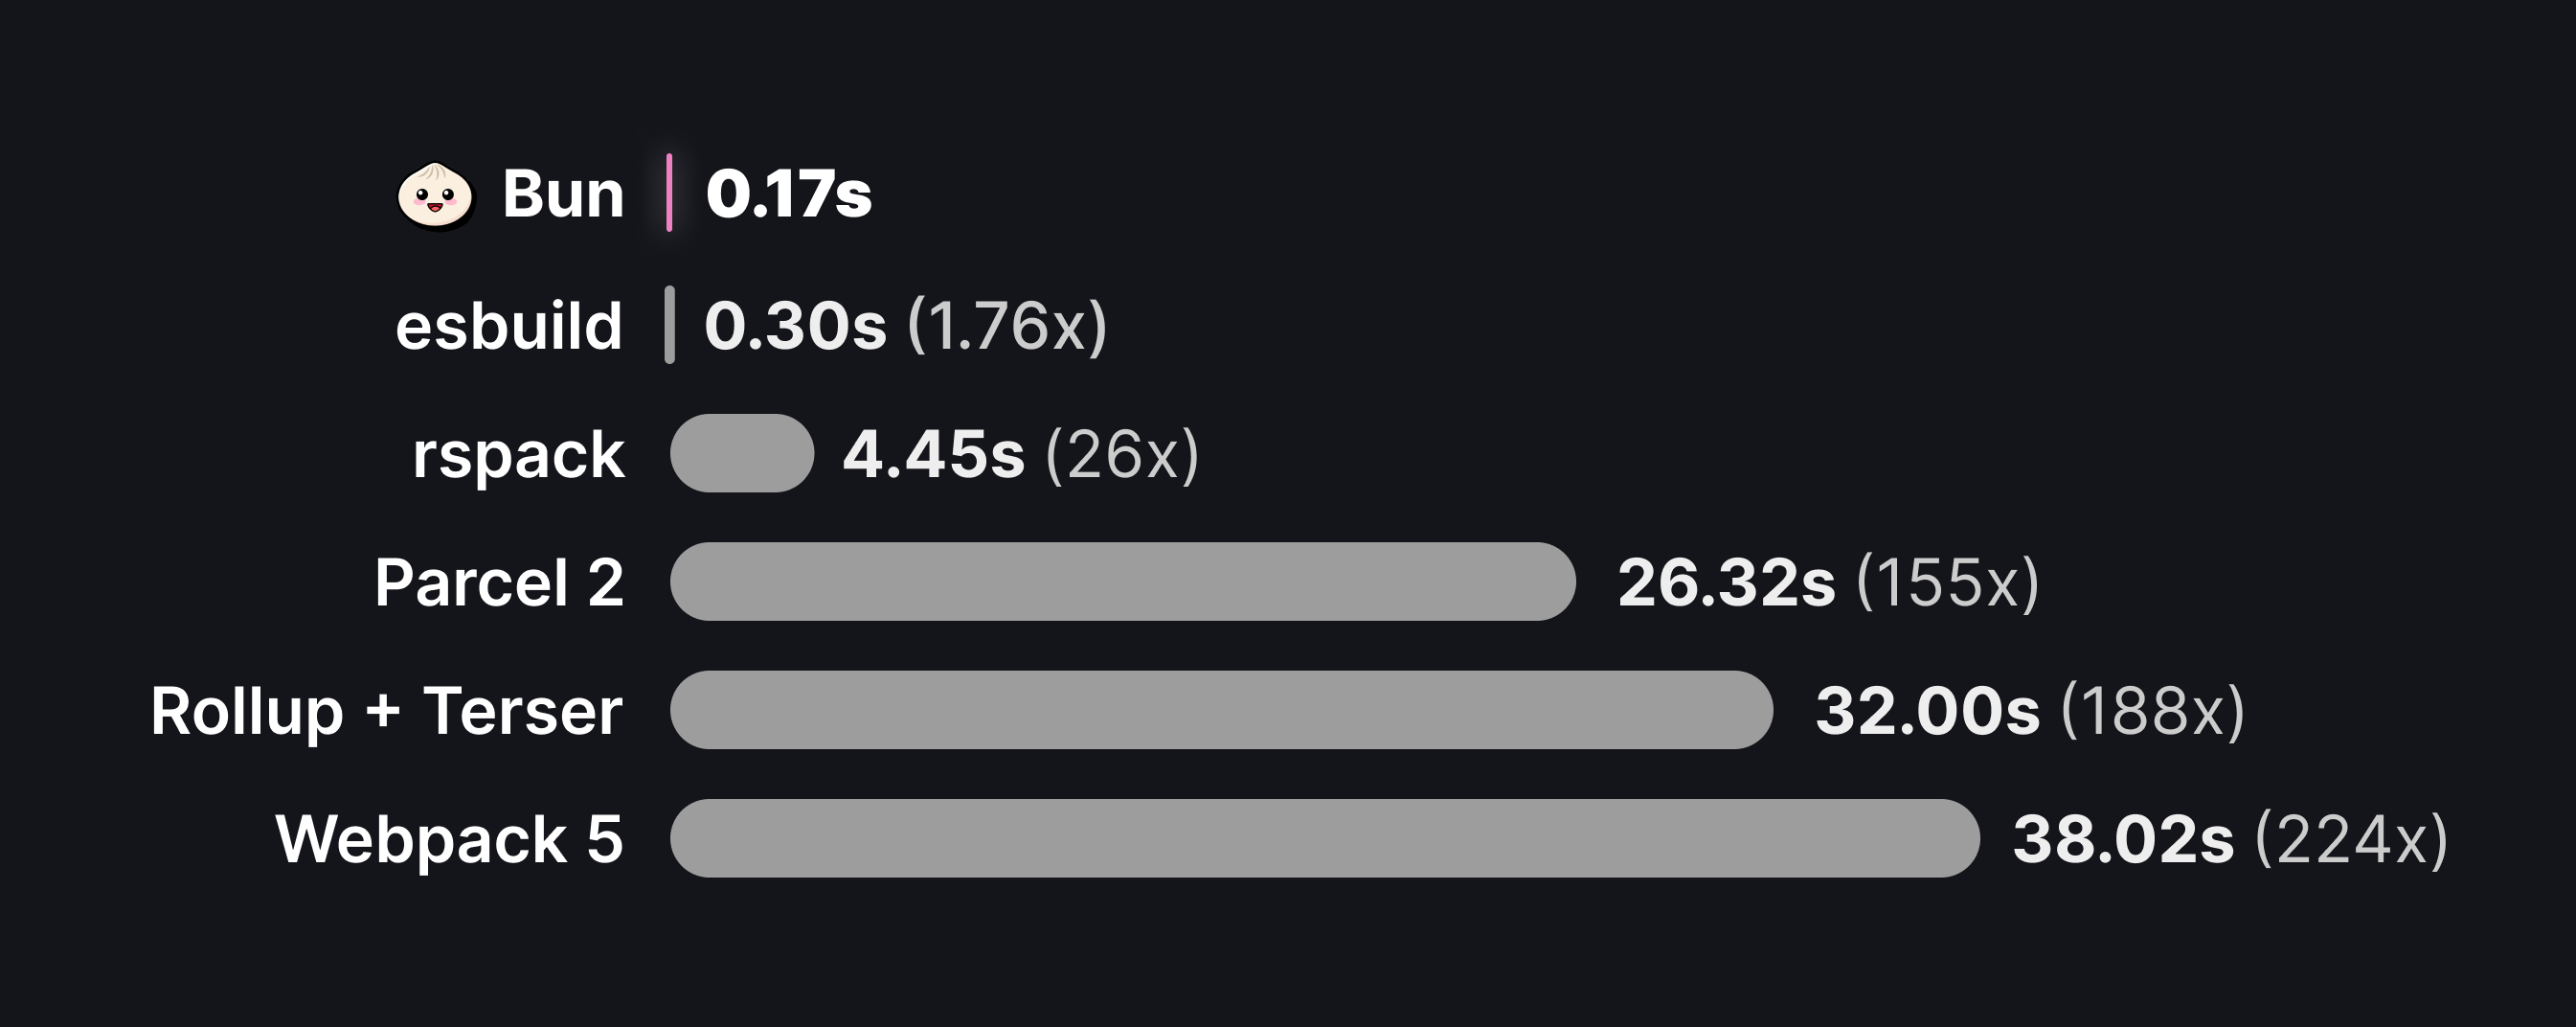
bun build ./index.tsx --outdir ./build它速度很快。下面的数字代表 esbuild 的 three.js 基准测试 上的性能。
为什么要打包?
打包器是 JavaScript 生态系统中基础设施的关键组成部分。简而言之,打包如此重要的原因如下:
- 减少 HTTP 请求。
node_modules中的单个包可能由数百个文件组成,而大型应用程序可能有数十个此类依赖项。使用单独的 HTTP 请求加载每个文件会很快变得不可行,因此打包器用于将我们的应用程序源代码转换为数量较少、自包含的“包”,以便一次请求加载。 - 代码转换。 现代应用程序通常使用 TypeScript、JSX 和 CSS Modules 等语言或工具构建,在浏览器消费它们之前,所有这些都必须转换为纯 JavaScript 和 CSS。打包器是配置这些转换的自然场所。
- 框架功能。 框架依赖于打包器插件和代码转换来实现常见模式,例如文件系统路由、客户端-服务器代码共存(例如
getServerSideProps或 Remix loaders)以及服务器组件。 - 全栈应用程序。 Bun 的打包器可以通过单个命令处理服务器端和客户端代码,从而实现优化的生产构建和单文件可执行文件。通过构建时 HTML 导入,您可以将整个应用程序——前端资源和后端服务器——打包成一个可部署单元。
让我们开始使用打包器 API。
请注意,Bun 打包器不旨在替换 tsc 进行类型检查或生成类型声明。
基本示例
让我们构建我们的第一个包。您拥有以下两个文件,它们实现了一个简单的客户端渲染的 React 应用程序。
import * as ReactDOM from 'react-dom/client';
import {Component} from "./Component"

const root = ReactDOM.createRoot(document.getElementById('root')!);
root.render(<Component message="Sup!" />)
export function Component(props: {message: string}) {
  return <p>{props.message}</p>
}
在这里,index.tsx 是我们应用程序的“入口点”。通常,这将是一个执行某些副作用的脚本,例如启动服务器,或者(在这种情况下)初始化 React 根。因为我们使用的是 TypeScript 和 JSX,所以在将代码发送到浏览器之前,我们需要对其进行打包。
创建我们的包
await Bun.build({
  entrypoints: ['./index.tsx'],
  outdir: './out',
})
bun build ./index.tsx --outdir ./out对于 entrypoints 中指定的每个文件,Bun 将生成一个新包。此包将写入当前工作目录解析到的 ./out 目录的磁盘。运行构建后,文件系统如下所示:
.
├── index.tsx
├── Component.tsx
└── out
    └── index.js
out/index.js 的内容将类似如下:
// ...
// ~20k lines of code
// including the contents of `react-dom/client` and all its dependencies
// this is where the $jsxDEV and $createRoot functions are defined


// Component.tsx
function Component(props) {
  return $jsxDEV("p", {
    children: props.message
  }, undefined, false, undefined, this);
}

// index.tsx
var rootNode = document.getElementById("root");
var root = $createRoot(rootNode);
root.render($jsxDEV(Component, {
  message: "Sup!"
}, undefined, false, undefined, this));
教程:在浏览器中运行此文件
Watch 模式
与运行时和测试运行器一样,打包器原生支持 watch 模式。
bun build ./index.tsx --outdir ./out --watch内容类型
与 Bun 运行时一样,打包器开箱即用地支持各种文件类型。下表分解了打包器的标准“加载器”集。有关完整文档,请参阅 Bundler > File types。
| 扩展名 | 详细信息 |
|---|---|
.js .jsx, .cjs .mjs .mts .cts .ts .tsx | 使用 Bun 内置的转译器解析文件并将 TypeScript/JSX 语法转译为 vanilla JavaScript。打包器执行一组默认转换,包括死代码消除和 tree shaking。目前 Bun 不会尝试向下转换语法;如果您使用最近的 ECMAScript 语法,则会在打包的代码中反映出来。 |
| JSON 文件被解析并内联到包中作为 JavaScript 对象。 |
| TOML 文件被解析并内联到包中作为 JavaScript 对象。 |
| 文本文件的内容被读取并作为字符串内联到包中。 |
.node .wasm | 这些文件由 Bun 运行时支持,但在打包期间,它们被视为资源。 |
资源
如果打包器遇到具有未知扩展名的导入,它会将导入的文件视为外部文件。引用的文件将按原样复制到 outdir,并且导入将解析为指向该文件的路径。
// bundle entrypoint
import logo from "./logo.svg";
console.log(logo);
// bundled output
var logo = "./logo-ab237dfe.svg";
console.log(logo);
文件加载器的确切行为也受到 naming 和 publicPath 的影响。
有关文件加载器的更完整文档,请参阅 Bundler > Loaders 页面。
插件
此表中描述的行为可以通过插件覆盖或扩展。有关完整文档,请参阅 Bundler > Loaders 页面。
API
entrypoints
必填。 对应于应用程序入口点的路径数组。每个入口点将生成一个包。
const result = await Bun.build({
  entrypoints: ["./index.ts"],
});
// => { success: boolean, outputs: BuildArtifact[], logs: BuildMessage[] }
bun build --entrypoints ./index.ts# the bundle will be printed to stdout
# <bundled code>outdir
输出文件将写入的目录。
const result = await Bun.build({
  entrypoints: ['./index.ts'],
  outdir: './out'
});
// => { success: boolean, outputs: BuildArtifact[], logs: BuildMessage[] }
bun build --entrypoints ./index.ts --outdir ./out# a summary of bundled files will be printed to stdout如果未将 outdir 传递给 JavaScript API,打包后的代码将不会写入磁盘。打包后的文件将在 BuildArtifact 对象数组中返回。这些对象是带有额外属性的 Blob;有关完整文档,请参阅 Outputs。
const result = await Bun.build({
  entrypoints: ["./index.ts"],
});

for (const res of result.outputs) {
  // Can be consumed as blobs
  await res.text();

  // Bun will set Content-Type and Etag headers
  new Response(res);

  // Can be written manually, but you should use `outdir` in this case.
  Bun.write(path.join("out", res.path), res);
}
当设置了 outdir 时,BuildArtifact 上的 path 属性将是其写入位置的绝对路径。
target
包的预期执行环境。
await Bun.build({
  entrypoints: ['./index.ts'],
  outdir: './out',
  target: 'browser', // default
})
bun build --entrypoints ./index.ts --outdir ./out --target browser根据目标,Bun 将应用不同的模块解析规则和优化。
模块解析
Bun 支持 NODE_PATH 环境变量以用于额外的模块解析路径。
NODE_PATH=./src bun build ./entry.js --outdir ./dist
browser | 默认。 用于生成旨在供浏览器执行的包。在解析导入时优先使用 "browser" 导出条件。导入任何内置模块(如 node:events 或 node:path)都可以正常工作,但调用某些函数(如 fs.readFile)将无法工作。 |
| 用于生成旨在由 Bun 运行时执行的包。在许多情况下,无需打包服务器端代码;您可以直接执行源代码而无需修改。但是,打包服务器代码可以减少启动时间并提高运行性能。这是用于构建全栈应用程序(具有构建时 HTML 导入,其中服务器端和客户端代码一起打包)的目标。 使用 如果任何入口点包含 Bun shebang( 当同时使用 |
node | 用于生成旨在由 Node.js 执行的包。在解析导入时优先使用 "node" 导出条件,并输出 .mjs。将来,这将自动 polyfill Bun 全局变量和其他内置的 bun:* 模块,尽管这尚未实现。 |
format
指定在生成的包中使用的模块格式。
Bun 默认为 "esm",并为 "cjs" 和 "iife" 提供实验性支持。
format: "esm" - ES 模块
这是默认格式,支持 ES 模块语法,包括顶层 await、import.meta 等。
await Bun.build({
  entrypoints: ['./index.tsx'],
  outdir: './out',
  format: "esm",
})
bun build ./index.tsx --outdir ./out --format esm要在浏览器中使用 ES 模块语法,请将 format 设置为 "esm",并确保您的 <script type="module"> 标签具有 type="module"。
format: "cjs" - CommonJS
要构建 CommonJS 模块,请将 format 设置为 "cjs"。选择 "cjs" 时,默认目标从 "browser" (esm) 更改为 "node" (cjs)。使用 format: "cjs", target: "node" 转译的 CommonJS 模块可以在 Bun 和 Node.js 中执行(假设使用的 API 受到两者的支持)。
await Bun.build({
  entrypoints: ['./index.tsx'],
  outdir: './out',
  format: "cjs",
})
bun build ./index.tsx --outdir ./out --format cjsformat: "iife" - IIFE
TODO:在支持 globalNames 后记录 IIFE。
jsx
配置 JSX 转换行为。允许对 JSX 的编译方式进行细粒度控制。
经典运行时示例(使用 factory 和 fragment)
await Bun.build({
  entrypoints: ['./app.tsx'],
  outdir: './out',
  jsx: {
    factory: 'h',
    fragment: 'Fragment',
    runtime: 'classic',
  },
})
# JSX configuration is handled via bunfig.toml or tsconfig.jsonbun build ./app.tsx --outdir ./out自动运行时示例(使用 importSource)
await Bun.build({
  entrypoints: ['./app.tsx'],
  outdir: './out',
  jsx: {
    importSource: 'preact',
    runtime: 'automatic',
  },
})
# JSX configuration is handled via bunfig.toml or tsconfig.jsonbun build ./app.tsx --outdir ./outsplitting
是否启用代码拆分。
await Bun.build({
  entrypoints: ['./index.tsx'],
  outdir: './out',
  splitting: false, // default
})
bun build ./index.tsx --outdir ./out --splitting当设置为 true 时,打包器将启用代码拆分。当多个入口点都导入同一个文件、模块或一组文件/模块时,通常将共享代码拆分成单独的包很有用。这个共享包被称为块。考虑以下文件:
import { shared } from './shared.ts';
import { shared } from './shared.ts';
export const shared = 'shared';
要使用代码拆分启用打包 entry-a.ts 和 entry-b.ts:
await Bun.build({
  entrypoints: ['./entry-a.ts', './entry-b.ts'],
  outdir: './out',
  splitting: true,
})
bun build ./entry-a.ts ./entry-b.ts --outdir ./out --splitting运行此构建将产生以下文件:
.
├── entry-a.tsx
├── entry-b.tsx
├── shared.tsx
└── out
    ├── entry-a.js
    ├── entry-b.js
    └── chunk-2fce6291bf86559d.js
生成的 chunk-2fce6291bf86559d.js 文件包含共享代码。为避免冲突,文件名默认会自动包含一个内容哈希。这可以使用 naming 进行自定义。
plugins
要用于打包的插件列表。
await Bun.build({
  entrypoints: ['./index.tsx'],
  outdir: './out',
  plugins: [/* ... */],
})
n/a
Bun 为 Bun 的运行时和打包器实现了通用的插件系统。有关完整文档,请参阅 插件文档。
env
控制打包过程中环境变量的处理方式。在内部,它使用 define 将环境变量注入到包中,但更容易指定要注入的环境变量。
env: "inline"
通过将 process.env.FOO 引用转换为包含实际环境变量值的字符串字面量,将环境变量注入到打包的输出中。
await Bun.build({
  entrypoints: ['./index.tsx'],
  outdir: './out',
  env: "inline",
})
FOO=bar BAZ=123 bun build ./index.tsx --outdir ./out --env inline对于以下输入
console.log(process.env.FOO);
console.log(process.env.BAZ);
生成的包将包含以下代码
console.log("bar");
console.log("123");
env: "PUBLIC_*" (前缀)
内联与给定前缀(* 字符之前的部分)匹配的环境变量,将 process.env.FOO 替换为实际的环境变量值。这对于选择性地内联环境变量(例如用于面向公众的 URL 或客户端令牌)非常有用,而无需担心将私有凭据注入到输出包中。
await Bun.build({
  entrypoints: ['./index.tsx'],
  outdir: './out',

  // Inline all env vars that start with "ACME_PUBLIC_"
  env: "ACME_PUBLIC_*",
})
FOO=bar BAZ=123 ACME_PUBLIC_URL=https://acme.com bun build ./index.tsx --outdir ./out --env 'ACME_PUBLIC_*'例如,给定以下环境变量
FOO=bar BAZ=123 ACME_PUBLIC_URL=https://acme.com和源代码
console.log(process.env.FOO);
console.log(process.env.ACME_PUBLIC_URL);
console.log(process.env.BAZ);
生成的包将包含以下代码
console.log(process.env.FOO);
console.log("https://acme.com");
console.log(process.env.BAZ);
env: "disable"
完全禁用环境变量注入。
例如,给定以下环境变量
FOO=bar BAZ=123 ACME_PUBLIC_URL=https://acme.com和源代码
console.log(process.env.FOO);
console.log(process.env.ACME_PUBLIC_URL);
console.log(process.env.BAZ);
生成的包将包含以下代码
console.log(process.env.FOO);
console.log(process.env.BAZ);
sourcemap
指定要生成的 sourcemap 类型。
await Bun.build({
  entrypoints: ['./index.tsx'],
  outdir: './out',
  sourcemap: 'linked', // default 'none'
})
bun build ./index.tsx --outdir ./out --sourcemap=linked"none" | 默认。 不生成 sourcemap。 |
| 使用 |
"external" | 在每个 *.js 包旁边创建一个单独的 *.js.map 文件,而不插入 //# sourceMappingURL 注释。 |
生成的包包含一个 debug id,可用于将包与其对应的 sourcemap 关联起来。此 debugId 作为注释添加到文件底部。
// <generated bundle code>

//# debugId=<DEBUG ID>
"inline"生成 sourcemap 并将其作为 base64 负载附加到生成的包的末尾。
// <bundled code here>

//# sourceMappingURL=data:application/json;base64,<encoded sourcemap here>
关联的
*.js.mapsourcemap 将是一个 JSON 文件,其中包含一个等效的debugId属性。
minify
是否启用代码压缩。默认为 false。
当目标为 bun 时,标识符将默认进行压缩。
当启用 minify.syntax 时,未使用的函数和类表达式名称将被移除,除非将 minify.keepNames 设置为 true 或使用了 --keep-names 标志。
启用所有代码压缩选项
await Bun.build({
  entrypoints: ['./index.tsx'],
  outdir: './out',
  minify: true, // default false
})
bun build ./index.tsx --outdir ./out --minify逐个启用某些代码压缩选项
await Bun.build({
  entrypoints: ['./index.tsx'],
  outdir: './out',
  minify: {
    whitespace: true,
    identifiers: true,
    syntax: true,
    keepNames: false, // default
  },
})
bun build ./index.tsx --outdir ./out --minify-whitespace --minify-identifiers --minify-syntax
# To preserve function and class names during minification:bun build ./index.tsx --outdir ./out --minify --keep-namesexternal
将被视为外部的导入路径列表。默认为 []。
await Bun.build({
  entrypoints: ['./index.tsx'],
  outdir: './out',
  external: ["lodash", "react"], // default: []
})
bun build ./index.tsx --outdir ./out --external lodash --external react外部导入是指不会包含在最终包中的导入。相反,import 语句将保持原样,在运行时解析。
例如,考虑以下入口文件
import _ from "lodash";
import {z} from "zod";

const value = z.string().parse("Hello world!")
console.log(_.upperCase(value));
通常,打包 index.tsx 会生成一个包含 "zod" 包全部源代码的包。如果相反,我们希望保留 import 语句原样,可以将其标记为外部
await Bun.build({
  entrypoints: ['./index.tsx'],
  outdir: './out',
  external: ['zod'],
})
bun build ./index.tsx --outdir ./out --external zod生成的包将大致如下所示
import {z} from "zod";

// ...
// the contents of the "lodash" package
// including the `_.upperCase` function

var value = z.string().parse("Hello world!")
console.log(_.upperCase(value));
要将所有导入标记为外部,请使用通配符 *
await Bun.build({
  entrypoints: ['./index.tsx'],
  outdir: './out',
  external: ['*'],
})
bun build ./index.tsx --outdir ./out --external '*'packages
控制是否将包依赖项包含在包中。可能的值:bundle (默认)、external。Bun 将任何路径不以 .、.. 或 / 开头的导入视为包。
await Bun.build({
  entrypoints: ['./index.ts'],
  packages: 'external',
})
bun build ./index.ts --packages externalnaming
自定义生成的文件名。默认为 ./[dir]/[name].[ext]。
await Bun.build({
  entrypoints: ['./index.tsx'],
  outdir: './out',
  naming: "[dir]/[name].[ext]", // default
})
bun build ./index.tsx --outdir ./out --entry-naming [dir]/[name].[ext]默认情况下,生成的包的名称基于关联的入口点名称。
.
├── index.tsx
└── out
    └── index.js
使用多个入口点时,生成的文件的层次结构将反映入口点的目录结构。
.
├── index.tsx
└── nested
    └── index.tsx
└── out
    ├── index.js
    └── nested
        └── index.js
可以使用 naming 字段自定义生成文件的名称和位置。此字段接受一个模板字符串,用于为所有对应于入口点的包生成文件名,其中以下令牌将被替换为其相应的值
[name]- 入口点文件的名称,不包含扩展名。[ext]- 生成包的扩展名。[hash]- 包内容的哈希值。[dir]- 从项目根目录到源文件父目录的相对路径。
例如
| 令牌 | [name] | [ext] | [hash] | [dir] |
|---|---|---|---|---|
./index.tsx | index | js | a1b2c3d4 | "" (空字符串) |
./nested/entry.ts | entry | js | c3d4e5f6 | "nested" |
我们可以组合这些令牌来创建一个模板字符串。例如,要在生成的包名称中包含哈希值
await Bun.build({
  entrypoints: ['./index.tsx'],
  outdir: './out',
  naming: 'files/[dir]/[name]-[hash].[ext]',
})
bun build ./index.tsx --outdir ./out --entry-naming [name]-[hash].[ext]此构建将导致以下文件结构
.
├── index.tsx
└── out
    └── files
        └── index-a1b2c3d4.js
当为 naming 字段提供了 string 时,它仅用于对应于入口点的包。块和复制资源的名称不受影响。使用 JavaScript API,可以为每种生成的文件类型指定单独的模板字符串。
await Bun.build({
  entrypoints: ['./index.tsx'],
  outdir: './out',
  naming: {
    // default values
    entry: '[dir]/[name].[ext]',
    chunk: '[name]-[hash].[ext]',
    asset: '[name]-[hash].[ext]',
  },
})
bun build ./index.tsx --outdir ./out --entry-naming "[dir]/[name].[ext]" --chunk-naming "[name]-[hash].[ext]" --asset-naming "[name]-[hash].[ext]"root
项目的根目录。
await Bun.build({
  entrypoints: ['./pages/a.tsx', './pages/b.tsx'],
  outdir: './out',
  root: '.',
})
n/a
如果未指定,则将其计算为所有入口点文件的第一个共同祖先。考虑以下文件结构
.
└── pages
  └── index.tsx
  └── settings.tsx
我们可以打包 pages 目录中的两个入口点
await Bun.build({
  entrypoints: ['./pages/index.tsx', './pages/settings.tsx'],
  outdir: './out',
})
bun build ./pages/index.tsx ./pages/settings.tsx --outdir ./out这将导致如下文件结构
.
└── pages
  └── index.tsx
  └── settings.tsx
└── out
  └── index.js
  └── settings.js
由于 pages 目录是入口点文件的第一个共同祖先,因此它被视为项目根目录。这意味着生成的包位于 out 目录的顶层;没有 out/pages 目录。
可以通过指定 root 选项来覆盖此行为
await Bun.build({
  entrypoints: ['./pages/index.tsx', './pages/settings.tsx'],
  outdir: './out',
  root: '.',
})
bun build ./pages/index.tsx ./pages/settings.tsx --outdir ./out --root .通过将 . 指定为 root,生成的文件结构将如下所示
.
└── pages
  └── index.tsx
  └── settings.tsx
└── out
  └── pages
    └── index.js
    └── settings.js
publicPath
添加到打包代码中任何导入路径的前缀。
在许多情况下,生成的包将不包含 import 语句。毕竟,打包的目标是将所有代码合并到一个文件中。但是,在一些情况下,生成的包将包含 import 语句。
- 资源导入 — 导入未识别的文件类型(如
*.svg)时,打包器会退回到fileloader,它将文件按原样复制到outdir。导入将被转换为变量 - 外部模块 — 文件和模块可以被标记为
external,在这种情况下,它们不会被包含在包中。相反,import语句将保留在最终的包中。 - 代码拆分。启用
splitting时,打包器可能会生成独立的“块”文件,这些文件代表多个入口点之间共享的代码。
在任何这些情况下,最终的包可能包含指向其他文件的路径。默认情况下,这些导入是相对的。以下是一个简单的资源导入示例
import logo from './logo.svg';
console.log(logo);
// logo.svg is copied into <outdir>
// and hash is added to the filename to prevent collisions
var logo = './logo-a7305bdef.svg';
console.log(logo);
设置 publicPath 将在所有文件路径前加上指定的值。
await Bun.build({
  entrypoints: ['./index.tsx'],
  outdir: './out',
  publicPath: 'https://cdn.example.com/', // default is undefined
})
bun build ./index.tsx --outdir ./out --public-path https://cdn.example.com/输出文件现在看起来大致如下。
var logo = './logo-a7305bdef.svg';
var logo = 'https://cdn.example.com/logo-a7305bdef.svg';
define
要在构建时替换的全局标识符的映射。此对象的键是标识符名称,值是将被内联的 JSON 字符串。
await Bun.build({
  entrypoints: ['./index.tsx'],
  outdir: './out',
  define: {
    STRING: JSON.stringify("value"),
    "nested.boolean": "true",
  },
})
bun build ./index.tsx --outdir ./out --define 'STRING="value"' --define "nested.boolean=true"loader
文件扩展名到内置加载器名称的映射。这可以用于快速自定义某些文件的加载方式。
await Bun.build({
  entrypoints: ['./index.tsx'],
  outdir: './out',
  loader: {
    ".png": "dataurl",
    ".txt": "file",
  },
})
bun build ./index.tsx --outdir ./out --loader .png:dataurl --loader .txt:filebanner
要添加到最终包的横幅,这可以是指令,例如 React 的 "use client",或者像代码许可证这样的注释块。
await Bun.build({
  entrypoints: ['./index.tsx'],
  outdir: './out',
  banner: '"use client";'
})
bun build ./index.tsx --outdir ./out --banner "\"use client\";"footer
要添加到最终包的页脚,这可能是一个注释块,用于许可证,或者只是一个有趣的彩蛋。
await Bun.build({
  entrypoints: ['./index.tsx'],
  outdir: './out',
  footer: '// built with love in SF'
})
bun build ./index.tsx --outdir ./out --footer="// built with love in SF"drop
从包中移除函数调用。例如,--drop=console 将移除所有对 console.log 的调用。调用参数也将被移除,无论这些参数是否可能产生副作用。移除 debugger 将移除所有 debugger 语句。
await Bun.build({
  entrypoints: ['./index.tsx'],
  outdir: './out',
  drop: ["console", "debugger", "anyIdentifier.or.propertyAccess"],
})
bun build ./index.tsx --outdir ./out --drop=console --drop=debugger --drop=anyIdentifier.or.propertyAccessthrow
控制构建失败时的错误处理行为。当设置为 true (默认) 时,返回的 Promise 会以 AggregateError 拒绝。当设置为 false 时,Promise 会以一个 success 为 false 的 BuildOutput 对象解析。
// Default behavior: throws on error
try {
  await Bun.build({
    entrypoints: ['./index.tsx'],
    throw: true, // default
  });
} catch (error) {
  // Handle AggregateError
  console.error("Build failed:", error);
}

// Alternative: handle errors via success property
const result = await Bun.build({
  entrypoints: ['./index.tsx'],
  throw: false,
});

if (!result.success) {
  console.error("Build failed with errors:", result.logs);
}
输出
Bun.build 函数返回一个 Promise<BuildOutput>,定义为
interface BuildOutput {
  outputs: BuildArtifact[];
  success: boolean;
  logs: Array<object>; // see docs for details
}

interface BuildArtifact extends Blob {
  kind: "entry-point" | "chunk" | "asset" | "sourcemap";
  path: string;
  loader: Loader;
  hash: string | null;
  sourcemap: BuildArtifact | null;
}
outputs 数组包含构建生成的所有文件。每个构件都实现了 Blob 接口。
const build = await Bun.build({
  /* */
});

for (const output of build.outputs) {
  await output.arrayBuffer(); // => ArrayBuffer
  await output.bytes(); // => Uint8Array
  await output.text(); // string
}
每个构件还包含以下属性
kind | 此文件是哪种类型的构建输出。构建会生成打包的入口点、代码拆分的“块”、sourcemaps、字节码和复制的资源(如图像)。 |
path | 文件在磁盘上的绝对路径 |
loader | 用于解释文件的加载器。请参阅 Bundler > Loaders 查看 Bun 如何将文件扩展名映射到适当的内置加载器。 |
hash | 文件内容的哈希值。对于资源始终定义。 |
sourcemap | 与此文件对应的 sourcemap 文件(如果已生成)。仅为入口点和块定义。 |
与 BunFile 类似,BuildArtifact 对象可以直接传递到 new Response() 中。
const build = await Bun.build({
  /* */
});

const artifact = build.outputs[0];

// Content-Type header is automatically set
return new Response(artifact);
Bun 运行时实现了对 BuildArtifact 对象的特殊漂亮打印,以方便调试。
// build.ts
const build = await Bun.build({/* */});

const artifact = build.outputs[0];
console.log(artifact);
bun run build.tsBuildArtifact (entry-point) {
path: "./index.js",
loader: "tsx",
kind: "entry-point",
hash: "824a039620219640",
Blob (114 bytes) {
type: "text/javascript;charset=utf-8"
},
sourcemap: null
}Bytecode
bytecode: boolean 选项可用于为任何 JavaScript/TypeScript 入口点生成字节码。这可以大大提高大型应用程序的启动时间。仅支持 "cjs" 格式,仅支持 "target": "bun",并且依赖于匹配的 Bun 版本。这会在每个入口点旁边添加一个对应的 .jsc 文件。
await Bun.build({
  entrypoints: ["./index.tsx"],
  outdir: "./out",
  bytecode: true,
})
bun build ./index.tsx --outdir ./out --bytecodeExecutables
Bun 支持将 JavaScript/TypeScript 入口点“编译”为独立的应用程序。此应用程序包含 Bun 二进制文件的副本。
bun build ./cli.tsx --outfile mycli --compile./mycli有关完整文档,请参阅 Bundler > Executables。
Logs and errors
失败时,Bun.build 会返回一个带有 AggregateError 的拒绝 Promise。这可以记录到控制台进行漂亮的错误列表打印,或者通过 try/catch 块进行编程方式读取。
try {
  const result = await Bun.build({
    entrypoints: ["./index.tsx"],
    outdir: "./out",
  });
} catch (e) {
  // TypeScript does not allow annotations on the catch clause
  const error = e as AggregateError;
  console.error("Build Failed");

  // Example: Using the built-in formatter
  console.error(error);

  // Example: Serializing the failure as a JSON string.
  console.error(JSON.stringify(error, null, 2));
}
大多数情况下,不需要显式的 try/catch,因为 Bun 会整齐地打印未捕获的异常。只需对 Bun.build 调用使用顶层 await 即可。
error.errors 中的每个项都是 BuildMessage 或 ResolveMessage(Error 的子类)的实例,其中包含每个错误的详细信息。
class BuildMessage {
  name: string;
  position?: Position;
  message: string;
  level: "error" | "warning" | "info" | "debug" | "verbose";
}

class ResolveMessage extends BuildMessage {
  code: string;
  referrer: string;
  specifier: string;
  importKind: ImportKind;
}
构建成功时,返回的对象包含一个 logs 属性,其中包含打包器的警告和信息消息。
const result = await Bun.build({
  entrypoints: ["./index.tsx"],
  outdir: "./out",
});

if (result.logs.length > 0) {
  console.warn("Build succeeded with warnings:");
  for (const message of result.logs) {
    // Bun will pretty print the message object
    console.warn(message);
  }
}
Reference
interface Bun {
  build(options: BuildOptions): Promise<BuildOutput>;
}

interface BuildConfig {
  entrypoints: string[]; // list of file path
  outdir?: string; // output directory
  target?: Target; // default: "browser"
  /**
   * Output module format. Top-level await is only supported for `"esm"`.
   *
   * Can be:
   * - `"esm"`
   * - `"cjs"` (**experimental**)
   * - `"iife"` (**experimental**)
   *
   * @default "esm"
   */
  format?: "esm" | "cjs" | "iife";
  /**
   * JSX configuration object for controlling JSX transform behavior
   */
  jsx?: {
    factory?: string;
    fragment?: string;
    importSource?: string;
    runtime?: "automatic" | "classic";
  };
  naming?:
    | string
    | {
        chunk?: string;
        entry?: string;
        asset?: string;
      };
  root?: string; // project root
  splitting?: boolean; // default true, enable code splitting
  plugins?: BunPlugin[];
  external?: string[];
  packages?: "bundle" | "external";
  publicPath?: string;
  define?: Record<string, string>;
  loader?: { [k in string]: Loader };
  sourcemap?: "none" | "linked" | "inline" | "external" | "linked" | boolean; // default: "none", true -> "inline"
  /**
   * package.json `exports` conditions used when resolving imports
   *
   * Equivalent to `--conditions` in `bun build` or `bun run`.
   *
   * https://node.org.cn/api/packages.html#exports
   */
  conditions?: Array<string> | string;

  /**
   * Controls how environment variables are handled during bundling.
   *
   * Can be one of:
   * - `"inline"`: Injects environment variables into the bundled output by converting `process.env.FOO`
   *   references to string literals containing the actual environment variable values
   * - `"disable"`: Disables environment variable injection entirely
   * - A string ending in `*`: Inlines environment variables that match the given prefix.
   *   For example, `"MY_PUBLIC_*"` will only include env vars starting with "MY_PUBLIC_"
   */
  env?: "inline" | "disable" | `${string}*`;
  minify?:
    | boolean
    | {
        whitespace?: boolean;
        syntax?: boolean;
        identifiers?: boolean;
        keepNames?: boolean;
      };
  /**
   * Ignore dead code elimination/tree-shaking annotations such as @__PURE__ and package.json
   * "sideEffects" fields. This should only be used as a temporary workaround for incorrect
   * annotations in libraries.
   */
  ignoreDCEAnnotations?: boolean;
  /**
   * Force emitting @__PURE__ annotations even if minify.whitespace is true.
   */
  emitDCEAnnotations?: boolean;

  /**
   * Generate bytecode for the output. This can dramatically improve cold
   * start times, but will make the final output larger and slightly increase
   * memory usage.
   *
   * Bytecode is currently only supported for CommonJS (`format: "cjs"`).
   *
   * Must be `target: "bun"`
   * @default false
   */
  bytecode?: boolean;
  /**
   * Add a banner to the bundled code such as "use client";
   */
  banner?: string;
  /**
   * Add a footer to the bundled code such as a comment block like
   *
   * `// made with bun!`
   */
  footer?: string;

  /**
   * Drop function calls to matching property accesses.
   */
  drop?: string[];

  /**
   * When set to `true`, the returned promise rejects with an AggregateError when a build failure happens.
   * When set to `false`, the `success` property of the returned object will be `false` when a build failure happens.
   *
   * This defaults to `true`.
   */
  throw?: boolean;
}

interface BuildOutput {
  outputs: BuildArtifact[];
  success: boolean;
  logs: Array<BuildMessage | ResolveMessage>;
}

interface BuildArtifact extends Blob {
  path: string;
  loader: Loader;
  hash: string | null;
  kind: "entry-point" | "chunk" | "asset" | "sourcemap" | "bytecode";
  sourcemap: BuildArtifact | null;
}

type Loader =
  | "js"
  | "jsx"
  | "ts"
  | "tsx"
  | "json"
  | "toml"
  | "file"
  | "napi"
  | "wasm"
  | "text";

interface BuildOutput {
  outputs: BuildArtifact[];
  success: boolean;
  logs: Array<BuildMessage | ResolveMessage>;
}

declare class ResolveMessage {
  readonly name: "ResolveMessage";
  readonly position: Position | null;
  readonly code: string;
  readonly message: string;
  readonly referrer: string;
  readonly specifier: string;
  readonly importKind:
    | "entry_point"
    | "stmt"
    | "require"
    | "import"
    | "dynamic"
    | "require_resolve"
    | "at"
    | "at_conditional"
    | "url"
    | "internal";
  readonly level: "error" | "warning" | "info" | "debug" | "verbose";

  toString(): string;
}