


该页面主要文档了 Bun 原生的 Bun.serve API。Bun 还实现了 fetch 以及 Node.js 的 http 和 https 模块。
这些模块已被重新实现,以使用 Bun 快速的内部 HTTP 基础设施。您可以直接使用这些模块;像 Express 这样依赖这些模块的框架应该可以开箱即用。有关详细的兼容性信息,请参阅 Runtime > Node.js APIs。
要以简洁的 API 启动高性能 HTTP 服务器,推荐的方法是使用 Bun.serve。
Bun.serve()
使用 Bun.serve 在 Bun 中启动 HTTP 服务器。
Bun.serve({
  // `routes` requires Bun v1.2.3+
  routes: {
    // Static routes
    "/api/status": new Response("OK"),

    // Dynamic routes
    "/users/:id": req => {
      return new Response(`Hello User ${req.params.id}!`);
    },

    // Per-HTTP method handlers
    "/api/posts": {
      GET: () => new Response("List posts"),
      POST: async req => {
        const body = await req.json();
        return Response.json({ created: true, ...body });
      },
    },

    // Wildcard route for all routes that start with "/api/" and aren't otherwise matched
    "/api/*": Response.json({ message: "Not found" }, { status: 404 }),

    // Redirect from /blog/hello to /blog/hello/world
    "/blog/hello": Response.redirect("/blog/hello/world"),

    // Serve a file by buffering it in memory
    "/favicon.ico": new Response(await Bun.file("./favicon.ico").bytes(), {
      headers: {
        "Content-Type": "image/x-icon",
      },
    }),
  },

  // (optional) fallback for unmatched routes:
  // Required if Bun's version < 1.2.3
  fetch(req) {
    return new Response("Not Found", { status: 404 });
  },
});
路由
Bun.serve() 中的路由接收一个 BunRequest (它扩展了 Request) 并返回一个 Response 或 Promise<Response>。这使得发送和接收 HTTP 请求的代码更容易保持一致。
// Simplified for brevity
interface BunRequest<T extends string> extends Request {
  params: Record<T, string>;
  readonly cookies: CookieMap;
}
路由中的 Async/await
您可以在路由处理器中使用 async/await 来返回一个 Promise<Response>。
import { sql, serve } from "bun";

serve({
  port: 3001,
  routes: {
    "/api/version": async () => {
      const [version] = await sql`SELECT version()`;
      return Response.json(version);
    },
  },
});
路由中的 Promise
您也可以从路由处理器返回一个 Promise<Response>。
import { sql, serve } from "bun";

serve({
  routes: {
    "/api/version": () => {
      return new Promise(resolve => {
        setTimeout(async () => {
          const [version] = await sql`SELECT version()`;
          resolve(Response.json(version));
        }, 100);
      });
    },
  },
});
类型安全的路由参数
TypeScript 在传递字符串字面量作为路由参数时会进行解析,这样您的编辑器在访问 request.params 时会显示自动补全。
import type { BunRequest } from "bun";

Bun.serve({
  routes: {
    // TypeScript knows the shape of params when passed as a string literal
    "/orgs/:orgId/repos/:repoId": req => {
      const { orgId, repoId } = req.params;
      return Response.json({ orgId, repoId });
    },

    "/orgs/:orgId/repos/:repoId/settings": (
      // optional: you can explicitly pass a type to BunRequest:
      req: BunRequest<"/orgs/:orgId/repos/:repoId/settings">,
    ) => {
      const { orgId, repoId } = req.params;
      return Response.json({ orgId, repoId });
    },
  },
});
百分比编码的路由参数值会被自动解码。支持 Unicode 字符。无效的 Unicode 将被替换为 Unicode 替换字符 &0xFFFD;。
静态响应
路由也可以是 Response 对象(没有处理器函数)。Bun.serve() 对其进行了优化,以实现零分配的调度——非常适合健康检查、重定向和固定内容。
Bun.serve({
  routes: {
    // Health checks
    "/health": new Response("OK"),
    "/ready": new Response("Ready", {
      headers: {
        // Pass custom headers
        "X-Ready": "1",
      },
    }),

    // Redirects
    "/blog": Response.redirect("https://bun.net.cn/blog"),

    // API responses
    "/api/config": Response.json({
      version: "1.0.0",
      env: "production",
    }),
  },
});
静态响应在初始化后不会分配额外的内存。与手动返回 Response 对象相比,您通常可以获得至少 15% 的性能提升。
静态路由响应会在服务器对象的生命周期内进行缓存。要重新加载静态路由,请调用 server.reload(options)。
文件响应与静态响应
在路由中提供文件时,根据是否缓冲文件内容或直接提供文件,存在两种不同的行为。
Bun.serve({
  routes: {
    // Static route - content is buffered in memory at startup
    "/logo.png": new Response(await Bun.file("./logo.png").bytes()),

    // File route - content is read from filesystem on each request
    "/download.zip": new Response(Bun.file("./download.zip")),
  },
});
静态路由(new Response(await file.bytes()))在启动时将内容缓冲到内存中。
- 请求期间零文件系统 I/O - 内容完全从内存中提供。
- ETag 支持 - 自动生成和验证 ETags 以进行缓存。
- If-None-Match - 当客户端 ETag 与服务器 ETag 匹配时,返回
304 Not Modified。 - 无 404 处理 - 缺少文件会导致启动错误,而不是运行时 404。
- 内存使用 - 整个文件内容存储在 RAM 中。
- 最适合:小型静态资源、API 响应、频繁访问的文件。
文件路由(new Response(Bun.file(path)))在每次请求时从文件系统中读取。
- 每次请求都进行文件系统读取 - 检查文件是否存在并读取内容。
- 内置 404 处理 - 如果文件不存在或变得不可访问,则返回
404 Not Found。 - Last-Modified 支持 - 使用文件的修改时间来处理
If-Modified-Since标头。 - If-Modified-Since - 当文件自客户端缓存版本以来未更改时,返回
304 Not Modified。 - Range 请求支持 - 使用
Content-Range标头自动处理部分内容请求。 - 流式传输 - 使用带背压处理的缓冲读取器,以实现高效的内存使用。
- 内存效率高 - 传输期间仅缓冲小块数据,而不是整个文件。
- 最适合:大文件、动态内容、用户上传、频繁更改的文件。
HTTP 缓存行为
两种路由类型都实现了 HTTP 缓存标准,但策略不同。
静态路由缓存
- ETag 生成:在启动时从内容自动计算 ETag 哈希值。
- If-None-Match:将客户端 ETag 与服务器 ETag 进行验证。
- 304 响应:当 ETags 匹配时,返回带有空主体的
304 Not Modified。 - 缓存标头:继承您在 Response 中提供的任何
Cache-Control标头。 - 一致性:ETag 在服务器重启或路由重新加载之前保持不变。
文件路由缓存
- Last-Modified:使用文件的
mtime作为Last-Modified标头。 - If-Modified-Since:比较客户端日期与文件修改时间。
- 304 响应:当文件自客户端缓存版本以来未更改时,返回
304 Not Modified。 - Content-Length:根据当前文件大小自动设置。
- 动态验证:在每次请求时检查文件修改时间。
状态码处理
两种路由类型都会自动调整状态码。
- 200 → 204:空文件(0 字节)返回
204 No Content而不是200 OK。 - 200 → 304:成功的缓存验证返回
304 Not Modified。 - 仅文件路由:缺少或无法访问的文件返回
404 Not Found。
const server = Bun.serve({
  static: {
    "/api/time": new Response(new Date().toISOString()),
  },

  fetch(req) {
    return new Response("404!");
  },
});

// Update the time every second.
setInterval(() => {
  server.reload({
    static: {
      "/api/time": new Response(new Date().toISOString()),
    },

    fetch(req) {
      return new Response("404!");
    },
  });
}, 1000);
重新加载路由只会影响下一个请求。进行中的请求将继续使用旧的路由。在旧路由的进行中请求完成后,旧路由将从内存中释放。
为了简化错误处理,静态路由不支持从 ReadableStream 或 AsyncIterator 流式传输响应主体。幸运的是,您仍然可以先将响应缓冲到内存中。
const time = await fetch("https://api.example.com/v1/data");
// Buffer the response in memory first.
const blob = await time.blob();

const server = Bun.serve({
  static: {
    "/api/data": new Response(blob),
  },

  fetch(req) {
    return new Response("404!");
  },
});
路由优先级
路由根据特异性顺序匹配。
- 精确路由(
/users/all) - 参数路由(
/users/:id) - 通配符路由(
/users/*) - 全局捕获所有(
/*)
Bun.serve({
  routes: {
    // Most specific first
    "/api/users/me": () => new Response("Current user"),
    "/api/users/:id": req => new Response(`User ${req.params.id}`),
    "/api/*": () => new Response("API catch-all"),
    "/*": () => new Response("Global catch-all"),
  },
});
按 HTTP 方法划分的路由
路由处理器可以通过 HTTP 方法进行专门化。
Bun.serve({
  routes: {
    "/api/posts": {
      // Different handlers per method
      GET: () => new Response("List posts"),
      POST: async req => {
        const post = await req.json();
        return Response.json({ id: crypto.randomUUID(), ...post });
      },
      PUT: async req => {
        const updates = await req.json();
        return Response.json({ updated: true, ...updates });
      },
      DELETE: () => new Response(null, { status: 204 }),
    },
  },
});
您可以传递以下任何一种方法:
| 方法 | 用例示例 |
|---|---|
GET | 获取资源 |
HEAD | 检查资源是否存在 |
OPTIONS | 获取允许的 HTTP 方法(CORS) |
DELETE | 删除资源 |
PATCH | 更新资源 |
POST | 创建资源 |
PUT | 更新资源 |
当传递一个函数而不是对象时,所有方法都将由该函数处理。
const server = Bun.serve({
  routes: {
    "/api/version": () => Response.json({ version: "1.0.0" }),
  },
});

await fetch(new URL("/api/version", server.url));
await fetch(new URL("/api/version", server.url), { method: "PUT" });
// ... etc
热路由重载
使用 server.reload() 更新路由,无需重启服务器。
const server = Bun.serve({
  routes: {
    "/api/version": () => Response.json({ version: "1.0.0" }),
  },
});

// Deploy new routes without downtime
server.reload({
  routes: {
    "/api/version": () => Response.json({ version: "2.0.0" }),
  },
});
错误处理
Bun 提供了结构化的路由错误处理。
Bun.serve({
  routes: {
    // Errors are caught automatically
    "/api/risky": () => {
      throw new Error("Something went wrong");
    },
  },
  // Global error handler
  error(error) {
    console.error(error);
    return new Response(`Internal Error: ${error.message}`, {
      status: 500,
      headers: {
        "Content-Type": "text/plain",
      },
    });
  },
});
HTML 导入
Bun 支持直接将 HTML 文件导入到您的服务器代码中,从而支持具有服务器端和客户端代码的全栈应用程序。HTML 导入有两种模式:
开发 (bun --hot): 资源在运行时按需打包,从而实现热模块替换 (HMR),提供快速、迭代的开发体验。当你更改前端代码时,浏览器会自动更新,无需完全重新加载页面。
生产 (bun build): 当使用 bun build --target=bun 构建时,import index from "./index.html" 语句会解析为一个预构建的 manifest 对象,其中包含所有已打包的客户端资源。Bun.serve 会使用此 manifest 来提供已优化的资源,而没有运行时打包的开销。这非常适合部署到生产环境。
import myReactSinglePageApp from "./index.html";

Bun.serve({
  routes: {
    "/": myReactSinglePageApp,
  },
});
HTML 导入不仅是提供 HTML — 它是一个功能齐全的前端打包器、转译器和工具包,使用 Bun 的 打包器、JavaScript 转译器和 CSS 解析器构建而成。你可以使用它来构建功能齐全的前端,支持 React、TypeScript、Tailwind CSS 等。
有关使用 HTML 导入构建全栈应用程序的完整指南,包括详细的示例和最佳实践,请参阅 /docs/bundler/fullstack。
实际示例:REST API
这是一个基础的、由数据库支持的 REST API,使用 Bun 的路由,零依赖。
import type { Post } from "./types.ts";
import { Database } from "bun:sqlite";

const db = new Database("posts.db");
db.exec(`
  CREATE TABLE IF NOT EXISTS posts (
    id TEXT PRIMARY KEY,
    title TEXT NOT NULL,
    content TEXT NOT NULL,
    created_at TEXT NOT NULL
  )
`);

Bun.serve({
  routes: {
    // List posts
    "/api/posts": {
      GET: () => {
        const posts = db.query("SELECT * FROM posts").all();
        return Response.json(posts);
      },

      // Create post
      POST: async req => {
        const post: Omit<Post, "id" | "created_at"> = await req.json();
        const id = crypto.randomUUID();

        db.query(
          `INSERT INTO posts (id, title, content, created_at)
           VALUES (?, ?, ?, ?)`,
        ).run(id, post.title, post.content, new Date().toISOString());

        return Response.json({ id, ...post }, { status: 201 });
      },
    },

    // Get post by ID
    "/api/posts/:id": req => {
      const post = db
        .query("SELECT * FROM posts WHERE id = ?")
        .get(req.params.id);

      if (!post) {
        return new Response("Not Found", { status: 404 });
      }

      return Response.json(post);
    },
  },

  error(error) {
    console.error(error);
    return new Response("Internal Server Error", { status: 500 });
  },
});
export interface Post {
  id: string;
  title: string;
  content: string;
  created_at: string;
}
路由性能
Bun.serve() 的路由建立在 uWebSocket 的 基于树的方法之上,增加了 SIMD 加速的路由参数解码 和 JavaScriptCore 结构缓存,以突破现代硬件性能的极限。
fetch 请求处理器
fetch 处理器处理任何路由未匹配到的传入请求。它接收一个 Request 对象,并返回一个 Response 或 Promise<Response>。
Bun.serve({
  fetch(req) {
    const url = new URL(req.url);
    if (url.pathname === "/") return new Response("Home page!");
    if (url.pathname === "/blog") return new Response("Blog!");
    return new Response("404!");
  },
});
fetch 处理器支持 async/await
import { sleep, serve } from "bun";
serve({
  async fetch(req) {
    const start = performance.now();
    await sleep(10);
    const end = performance.now();
    return new Response(`Slept for ${end - start}ms`);
  },
});
也支持基于 Promise 的响应
Bun.serve({
  fetch(req) {
    // Forward the request to another server.
    return fetch("https://example.com");
  },
});
你也可以从 fetch 处理器访问 Server 对象。它是传递给 fetch 函数的第二个参数。
// `server` is passed in as the second argument to `fetch`.
const server = Bun.serve({
  fetch(req, server) {
    const ip = server.requestIP(req);
    return new Response(`Your IP is ${ip}`);
  },
});
更改 port 和 hostname
要配置服务器监听的端口和主机名,请在 options 对象中设置 port 和 hostname。
Bun.serve({
  port: 8080, // defaults to $BUN_PORT, $PORT, $NODE_PORT otherwise 3000
  hostname: "mydomain.com", // defaults to "0.0.0.0"
  fetch(req) {
    return new Response("404!");
  },
});
要随机选择一个可用端口,请将 port 设置为 0。
const server = Bun.serve({
  port: 0, // random port
  fetch(req) {
    return new Response("404!");
  },
});

// server.port is the randomly selected port
console.log(server.port);
你可以通过访问服务器对象的 port 属性,或者访问 url 属性来查看选定的端口。
console.log(server.port); // 3000
console.log(server.url); // https://:3000
配置默认端口
Bun 支持多种选项和环境变量来配置默认端口。当未设置 port 选项时,将使用默认端口。
--portCLI 标志
bun --port=4002 server.tsBUN_PORT环境变量
BUN_PORT=4002 bun server.tsPORT环境变量
PORT=4002 bun server.tsNODE_PORT环境变量
NODE_PORT=4002 bun server.tsUnix domain sockets
要监听一个 unix domain socket,请将 unix 选项设置为 socket 的路径。
Bun.serve({
  unix: "/tmp/my-socket.sock", // path to socket
  fetch(req) {
    return new Response(`404!`);
  },
});
抽象命名空间 sockets
Bun 支持 Linux 抽象命名空间 sockets。要使用抽象命名空间 socket,请在 unix 路径前加上一个 null 字节。
Bun.serve({
  unix: "\0my-abstract-socket", // abstract namespace socket
  fetch(req) {
    return new Response(`404!`);
  },
});
与 unix domain sockets 不同,抽象命名空间 sockets 不绑定到文件系统,并且在最后一个 socket 引用关闭时会自动删除。
错误处理
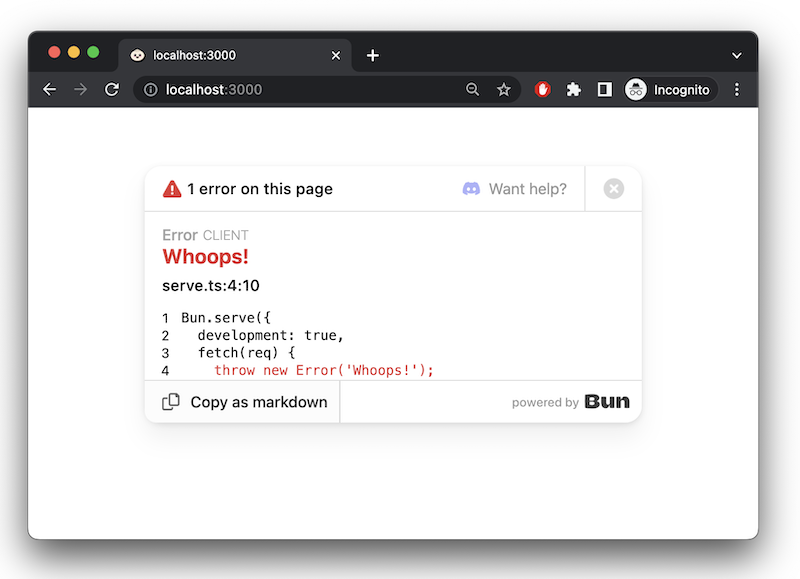
要激活开发模式,请设置 development: true。
Bun.serve({
  development: true,
  fetch(req) {
    throw new Error("woops!");
  },
});
在开发模式下,Bun 会在浏览器中显示错误,并提供内置的错误页面。
error 回调
要处理服务器端错误,请实现一个 error 处理器。此函数应返回一个 Response,在发生错误时提供给客户端。此响应将取代 development 模式下 Bun 的默认错误页面。
Bun.serve({
  fetch(req) {
    throw new Error("woops!");
  },
  error(error) {
    return new Response(`<pre>${error}\n${error.stack}</pre>`, {
      headers: {
        "Content-Type": "text/html",
      },
    });
  },
});
调用 Bun.serve 会返回一个 Server 对象。要停止服务器,请调用 .stop() 方法。
const server = Bun.serve({
  fetch() {
    return new Response("Bun!");
  },
});

server.stop();
TLS
Bun 内置支持 TLS,由 BoringSSL 提供支持。通过为 key 和 cert 提供值来启用 TLS;两者都是启用 TLS 所必需的。
Bun.serve({
  fetch(req) {
    return new Response("Hello!!!");
  },

  tls: {
    key: Bun.file("./key.pem"),
    cert: Bun.file("./cert.pem"),
  }
});
key 和 cert 字段需要您的 TLS 密钥和证书的 *内容*,*而不是其路径*。它可以是字符串、BunFile、TypedArray 或 Buffer。
Bun.serve({
  fetch() {},

  tls: {
    // BunFile
    key: Bun.file("./key.pem"),
    // Buffer
    key: fs.readFileSync("./key.pem"),
    // string
    key: fs.readFileSync("./key.pem", "utf8"),
    // array of above
    key: [Bun.file("./key1.pem"), Bun.file("./key2.pem")],
  },
});
如果您的私钥使用密码加密,请为 passphrase 提供一个值来解密它。
Bun.serve({
  fetch(req) {
    return new Response("Hello!!!");
  },

  tls: {
    key: Bun.file("./key.pem"),
    cert: Bun.file("./cert.pem"),
    passphrase: "my-secret-passphrase",
  }
});
可选地,您可以通过为 ca 提供一个值来覆盖受信任的 CA 证书。默认情况下,服务器将信任 Mozilla 维护的知名 CA 列表。当指定 ca 时,Mozilla 列表将被覆盖。
Bun.serve({
  fetch(req) {
    return new Response("Hello!!!");
  },
  tls: {
    key: Bun.file("./key.pem"), // path to TLS key
    cert: Bun.file("./cert.pem"), // path to TLS cert
    ca: Bun.file("./ca.pem"), // path to root CA certificate
  }
});
覆盖 Diffie-Hellman 参数
Bun.serve({
  // ...
  tls: {
    // other config
    dhParamsFile: "/path/to/dhparams.pem", // path to Diffie Hellman parameters
  },
});
服务器名称指示 (SNI)
要配置服务器的服务器名称指示 (SNI),请在 tls 对象中设置 serverName 字段。
Bun.serve({
  // ...
  tls: {
    // ... other config
    serverName: "my-server.com", // SNI
  },
});
要允许多个服务器名称,请将一个对象数组传递给 tls,每个对象都包含一个 serverName 字段。
Bun.serve({
  // ...
  tls: [
    {
      key: Bun.file("./key1.pem"),
      cert: Bun.file("./cert1.pem"),
      serverName: "my-server1.com",
    },
    {
      key: Bun.file("./key2.pem"),
      cert: Bun.file("./cert2.pem"),
      serverName: "my-server2.com",
    },
  ],
});
idleTimeout
要配置空闲超时,请在 Bun.serve 中设置 idleTimeout 字段。
Bun.serve({
  // 10 seconds:
  idleTimeout: 10,

  fetch(req) {
    return new Response("Bun!");
  },
});
这是在服务器关闭连接之前允许连接空闲的最长时间。如果连接在发送或接收数据时没有活动,则该连接处于空闲状态。
export default 语法
到目前为止,本页上的示例都使用了显式的 Bun.serve API。Bun 还支持另一种语法。
import {type Serve} from "bun";

export default {
  fetch(req) {
    return new Response("Bun!");
  },
} satisfies Serve;
将服务器选项传递给 Bun.serve 的替代方法是 export default 它。此文件可以原样执行;当 Bun 看到一个包含 fetch 处理程序的 default 导出的文件时,它会在后台将其传递给 Bun.serve。
流式传输文件
要流式传输一个文件,请返回一个带有 BunFile 对象作为体的 Response 对象。
Bun.serve({
  fetch(req) {
    return new Response(Bun.file("./hello.txt"));
  },
});
⚡️ 速度 — Bun 会在可能的情况下自动使用 sendfile(2) 系统调用,从而在内核中实现零拷贝文件传输 — 这是发送文件的最快方式。
您可以通过 Bun.file 对象上的 slice(start, end) 方法发送文件的部分内容。这会自动在 Response 对象上设置 Content-Range 和 Content-Length 标头。
Bun.serve({
  fetch(req) {
    // parse `Range` header
    const [start = 0, end = Infinity] = req.headers
      .get("Range") // Range: bytes=0-100
      .split("=") // ["Range: bytes", "0-100"]
      .at(-1) // "0-100"
      .split("-") // ["0", "100"]
      .map(Number); // [0, 100]

    // return a slice of the file
    const bigFile = Bun.file("./big-video.mp4");
    return new Response(bigFile.slice(start, end));
  },
});
服务器生命周期方法
server.stop() - 停止服务器
停止服务器接受新连接
const server = Bun.serve({
  fetch(req) {
    return new Response("Hello!");
  },
});

// Gracefully stop the server (waits for in-flight requests)
await server.stop();

// Force stop and close all active connections
await server.stop(true);
默认情况下,stop() 允许正在进行中的请求和 WebSocket 连接完成。传递 true 会立即终止所有连接。
server.ref() 和 server.unref() - 进程生命周期控制
控制服务器是否保持 Bun 进程的运行
// Don't keep process alive if server is the only thing running
server.unref();

// Restore default behavior - keep process alive
server.ref();
server.reload() - 热重载处理器
在不重启的情况下更新服务器的处理器
const server = Bun.serve({
  routes: {
    "/api/version": Response.json({ version: "v1" }),
  },
  fetch(req) {
    return new Response("v1");
  },
});

// Update to new handler
server.reload({
  routes: {
    "/api/version": Response.json({ version: "v2" }),
  },
  fetch(req) {
    return new Response("v2");
  },
});
这对于开发和热重载很有用。只能更新 fetch、error 和 routes。
每个请求的控制
server.timeout(Request, seconds) - 自定义请求超时
为单个请求设置自定义空闲超时
const server = Bun.serve({
  fetch(req, server) {
    // Set 60 second timeout for this request
    server.timeout(req, 60);

    // If they take longer than 60 seconds to send the body, the request will be aborted
    await req.text();

    return new Response("Done!");
  },
});
传递 0 以禁用请求的超时。
server.requestIP(Request) - 获取客户端信息
获取客户端 IP 和端口信息
const server = Bun.serve({
  fetch(req, server) {
    const address = server.requestIP(req);
    if (address) {
      return new Response(
        `Client IP: ${address.address}, Port: ${address.port}`,
      );
    }
    return new Response("Unknown client");
  },
});
对于已关闭的请求或 Unix domain sockets,返回 null。
处理 Cookies
Bun 提供了一个内置 API,用于在 HTTP 请求和响应中处理 cookies。BunRequest 对象包含一个 cookies 属性,该属性提供了一个 CookieMap,方便访问和操作 cookies。当使用 routes 时,Bun.serve() 会自动跟踪 request.cookies.set 并将其应用于响应。
读取 cookies
使用 BunRequest 对象上的 cookies 属性从传入请求中读取 cookies。
Bun.serve({
  routes: {
    "/profile": req => {
      // Access cookies from the request
      const userId = req.cookies.get("user_id");
      const theme = req.cookies.get("theme") || "light";

      return Response.json({
        userId,
        theme,
        message: "Profile page",
      });
    },
  },
});
设置 cookies
要设置 cookies,请使用 BunRequest 对象中的 CookieMap 上的 set 方法。
Bun.serve({
  routes: {
    "/login": req => {
      const cookies = req.cookies;

      // Set a cookie with various options
      cookies.set("user_id", "12345", {
        maxAge: 60 * 60 * 24 * 7, // 1 week
        httpOnly: true,
        secure: true,
        path: "/",
      });

      // Add a theme preference cookie
      cookies.set("theme", "dark");

      // Modified cookies from the request are automatically applied to the response
      return new Response("Login successful");
    },
  },
});
Bun.serve() 会自动跟踪请求中修改过的 cookies,并将它们应用于响应。
删除 cookies
要删除 cookie,请使用 request.cookies (CookieMap) 对象上的 delete 方法。
Bun.serve({
  routes: {
    "/logout": req => {
      // Delete the user_id cookie
      req.cookies.delete("user_id", {
        path: "/",
      });

      return new Response("Logged out successfully");
    },
  },
});
删除的 cookie 会变成响应中的 Set-Cookie 标头,其中 maxAge 设置为 0,value 为空。
服务器指标
server.pendingRequests 和 server.pendingWebSockets
使用内置计数器监控服务器活动
const server = Bun.serve({
  fetch(req, server) {
    return new Response(
      `Active requests: ${server.pendingRequests}\n` +
        `Active WebSockets: ${server.pendingWebSockets}`,
    );
  },
});
server.subscriberCount(topic) - WebSocket 订阅者
获取 WebSocket 主题的订阅者数量
const server = Bun.serve({
  fetch(req, server) {
    const chatUsers = server.subscriberCount("chat");
    return new Response(`${chatUsers} users in chat`);
  },
  websocket: {
    message(ws) {
      ws.subscribe("chat");
    },
  },
});
WebSocket 配置
server.publish(topic, data, compress) - WebSocket 消息发布
服务器可以将消息发布给订阅了某个主题的所有 WebSocket 客户端。
const server = Bun.serve({
  websocket: {
    message(ws) {
      // Publish to all "chat" subscribers
      server.publish("chat", "Hello everyone!");
    },
  },

  fetch(req) {
    // ...
  },
});
publish() 方法返回
- 成功发送的字节数
- 如果消息被丢弃,则为
0 - 如果应用了背压,则为
-1
WebSocket 处理器选项
配置 WebSockets 时,可以通过 websocket 处理器使用多种高级选项。
Bun.serve({
  websocket: {
    // Maximum message size (in bytes)
    maxPayloadLength: 64 * 1024,

    // Backpressure limit before messages are dropped
    backpressureLimit: 1024 * 1024,

    // Close connection if backpressure limit is hit
    closeOnBackpressureLimit: true,

    // Handler called when backpressure is relieved
    drain(ws) {
      console.log("Backpressure relieved");
    },

    // Enable per-message deflate compression
    perMessageDeflate: {
      compress: true,
      decompress: true,
    },

    // Send ping frames to keep connection alive
    sendPings: true,

    // Handlers for ping/pong frames
    ping(ws, data) {
      console.log("Received ping");
    },
    pong(ws, data) {
      console.log("Received pong");
    },

    // Whether server receives its own published messages
    publishToSelf: false,
  },
});
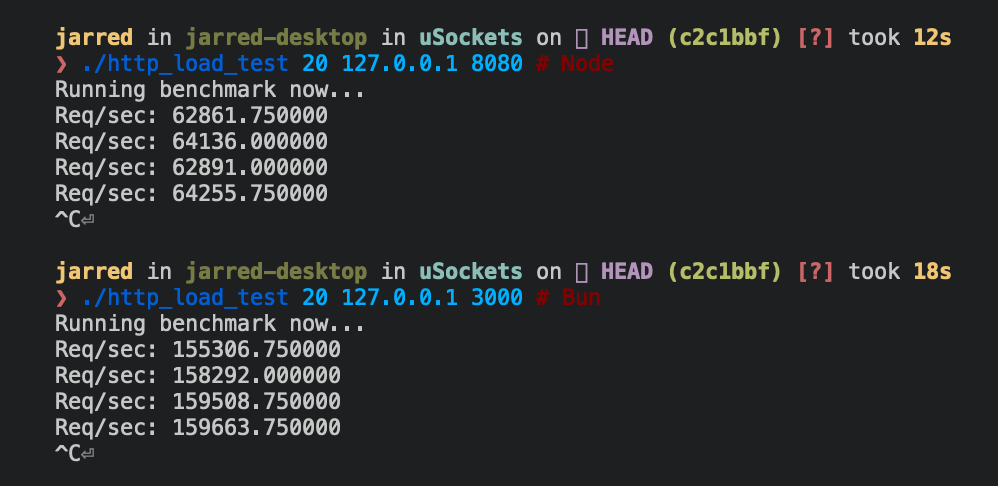
基准测试
以下是 Bun 和 Node.js 实现的一个简单 HTTP 服务器,该服务器对每个传入的 Request 响应 Bun!。
Bun.serve({
  fetch(req: Request) {
    return new Response("Bun!");
  },
  port: 3000,
});
require("http")
  .createServer((req, res) => res.end("Bun!"))
  .listen(8080);
Bun.serve 服务器在 Linux 上每秒处理的请求数大约是 Node.js 的 2.5 倍。
| 运行时 | 每秒请求数 |
|---|---|
| Node 16 | ~64,000 |
| Bun | ~160,000 |
Reference
查看 TypeScript 定义